Increasing the RAM aids in speeding up and even boosting your phones speeds. Just by altering some adjustments on your SD Card and 2 programs, you can get faster speeds and better performance from your Android Device(s).
As everyone already knows, Android is the largest brand in alteration and advanced modification. Provided that you already have rooted your Android device, then reading this tutorial will provide you with more knowledge on how you can easily increase your Android’s RAM without making any changes onto your hardware.
The simplest way to provide more RAM to your android device, is right here in this article. Simply follow the process below. However, you must be informed of the requirements before you begin in order to perform the operation.
Requirements:
*Rooted Android Device (Tablet | Phone)
*SD Card (Must by at least 4GB & Class 4)
*SD Card Reader
*Windows-Based Computer
Now the process of alteration can be followed once you have all of the information. Please be sure that your SD card is properly formatted and blank. If you have any images on your SD Card, I encourage you to save them onto your computer and/or an online source like DropBox.
Step 1)
This process requires you to download and install a specific software on your computer. The software is called Mini Tool Partition. This software will allow you to perform a partition of your SD Card. You must insert your SD Card into the SD Card Reader on your desktop or laptop.
Step 2)
You will need to open the Mini Tool Partition, and on the Disk Selection window, select your SD Card. Right Click on the desired SD Card and click on Delete. Basically this version of Delete will format your SD Card to work properly.
Step 3)
Now that you have formated your SD Card, you can right-click on the respective SD Card selection and then select Create. This will then create special partitions. However, if your SD Card is below 4GB, you may want to select the “FAT” partition; if you have a bigger SD Card, you can opt-in for the FAT 32.
Step 4) **Note, it is crucial to follow this next step exactly, other wise, you may end up corrupting your SD Card.**
Now that you have selected the proper File System, you can simply drag the size as well as the location. Please leave the 1000MB on the Unallocated Space. The rest is for the partitioning size. Now you can select OK.
Step 5)
Since you have left the 1000MB unallocated space, this will allow it to get it located properly. Right-Click on the SD Card selection and select Create. Select the Primary just as the same on the previous and then you need to select Ext2, not FAT32. During this, you should not to leave any unallocated space. Now you can click OK, Done.
Step 6)
Now the editing of the partitioning of your SD Card is completed. You can simply click on the Apply button located at the top left corner of the Mini Tool Partition Wizard. Eject your SD Card, and proceed onto placing it into your desired Android Device.
Step 7)
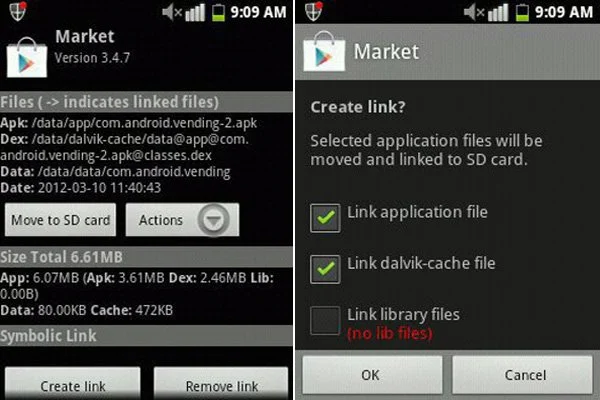
Now you need to download and install “Link2SD”. This can be found on the Google Play Store from your mobile device.
Step 8)
Simply open up the new downloaded application, where it will then ask you for the Rooted Device. You will have to stop the process and ensure your Android device is, before you can continue.
After that, the application will ask for the file system, such as .Ext partition. Just select the Ext2 selection that you had created during the Mini Tool Partition process. Then select OK.
Step 9)
Now you need to prepare the application in order to take the partitioned space in which we have taken the 1000MB. Then you can link them all together.
As mentioned at the beginning of the article, we are not adding any type of hardware. Instead, we are just increasing the RAM inside your Android by means of utilizing your own SD Card. The whole process should only take approximately 10-50 minutes to perform.
Sources: CodingSec, DropBox, CNet, Google Play Store, Anonhq.com


0 comments